
Learning how to tie a bow tie is an essential skill for any gentleman attending a wedding, black-tie event, gala, prom, or formal celebration. While pre-tied bow ties may seem convenient, nothing matches the elegance and authenticity of a properly tied self-tie bow tie.
At Tuxedo Fashions, we’ve helped Bay Area gentlemen look their best for over 50 years. This guide will walk you through exactly how to tie a bow tie so you can achieve a polished, sophisticated appearance for your next formal event.
Why Learn How to Tie a Bow Tie?
A self-tie bow tie offers several advantages:
- Creates a more authentic formalwear appearance
- Shows attention to detail and personal style
- Provides a slightly unique shape every time
- Is considered the gold standard for black-tie attire
- Enhances the overall elegance of a tuxedo
Whether you’re the groom, a groomsman, or a wedding guest, mastering this skill can elevate your formal look.
What You’ll Need
Before you begin:
- A self-tie
- A dress shirt with a properly fitted collar
- A mirror
- A few minutes of practice
Don’t be discouraged if it takes a few attempts. Most people need several tries before becoming comfortable with the process.
Step-by-Step Instructions: How to Tie a Bow Tie
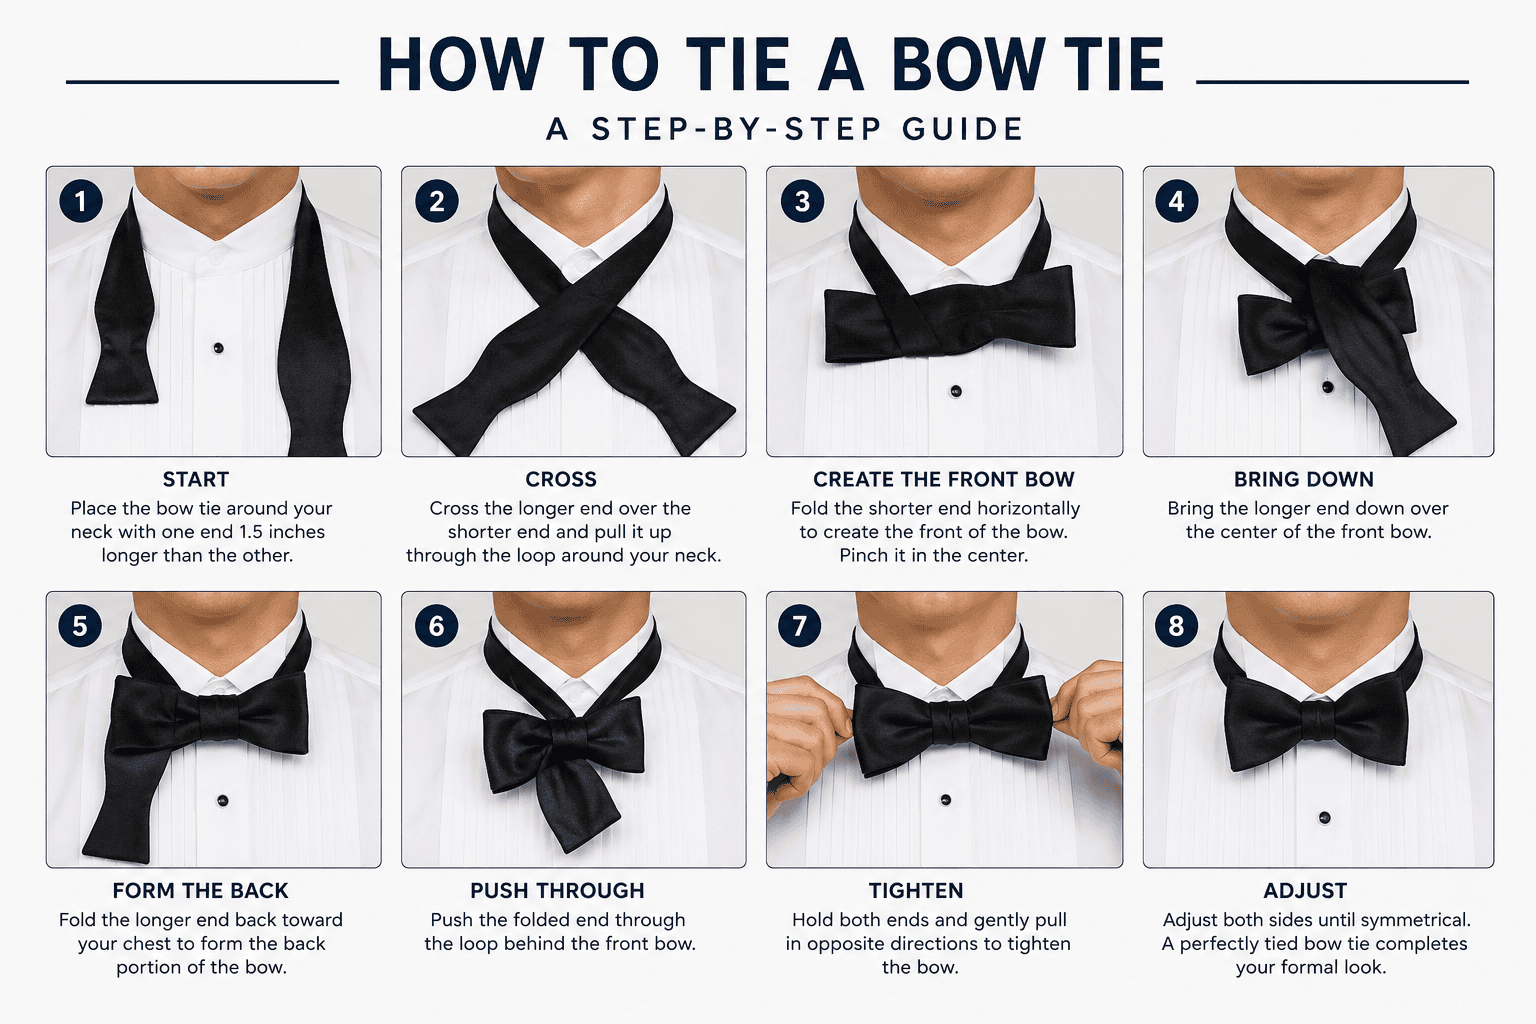
Step 1: Start with the Bow Tie Around Your Neck
Place the bow tie around your neck with one end hanging approximately 1.5 inches longer than the other.
The longer end will do most of the work during the tying process.
Step 2: Cross the Longer End Over the Shorter End
Cross the longer end over the shorter end, creating an “X” shape just below your collar.
Pull the longer end upward through the loop around your neck.
Tighten gently until the bow tie sits comfortably against your collar.
Step 3: Create the Front Bow Shape
Take the shorter end and fold it horizontally to form the front portion of the bow.
Pinch the folded section at its center to maintain the bow shape.
This folded piece will remain visible on the front of the finished bow tie.
Step 4: Bring the Longer End Down Over the Center
Allow the longer end to drape directly down over the center of the folded bow.
You should now see a bow shape in front with the longer end hanging vertically over it.
Step 5: Form the Back Bow
Fold the hanging end back toward your chest.
This creates the rear portion of the bow tie.
Locate the small loop behind the front bow that has formed naturally during the previous steps.
Step 6: Push the Folded End Through the Loop
Carefully push the folded section through the loop behind the bow.
Do not force it. The folded end should slide through while maintaining its shape.
Once through, you’ll have both sides of the bow tie formed.
Step 7: Tighten and Adjust
Hold the front and back loops and gently pull opposite ends to tighten the bow.
Adjust until both sides appear symmetrical.
A self-tie bow tie should not look perfectly uniform. Slight imperfections are part of its charm and distinguish it from a pre-tied version.
Common Bow Tie Mistakes to Avoid
Making the Bow Too Tight
Over-tightening can distort the shape and create an uncomfortable fit.
Uneven Loops
Take a moment to adjust both sides so they appear balanced.
Incorrect Collar Position
Always ensure your collar sits neatly over the bow tie band.
Choosing the Wrong Size
Most quality bow ties are adjustable. Make sure the neck size matches your dress shirt collar measurement.
When Should You Wear a Bow Tie?
Bow ties are traditionally worn with:
- Tuxedos
- Black-tie attire
- Wedding formalwear
- Galas and charity events
- Formal dinners
- Award ceremonies
- Holiday parties
A black silk bow tie remains the classic choice for traditional black-tie events.
Self-Tie vs. Pre-Tied Bow Ties
Self-Tie Bow Tie
Pros:
- Traditional and authentic
- Preferred by formalwear enthusiasts
- More sophisticated appearance
Cons:
- Requires practice
Pre-Tied Bow Tie
Pros:
- Quick and convenient
- Easy for first-time wearers
Cons:
- Can appear less authentic
- Lacks the character of a hand-tied bow
For weddings and black-tie occasions, most formalwear experts recommend a self-tie bow tie whenever possible.
Complete Your Formal Look
A bow tie is only one piece of a polished formal outfit. Pair it with:
- A properly fitted tuxedo
- Formal dress shirt
- Pocket square
- Cufflinks and studs
- Patent leather or formal dress shoes
The right accessories work together to create a timeless and refined appearance.
Visit Tuxedo Fashions for Expert Formalwear Advice
For over 50 years, Tuxedo Fashions has helped Bay Area grooms, wedding parties, prom attendees, and formal event guests find the perfect look. Whether you need a tuxedo rental, tuxedo purchase, suit rental, or expert styling advice, our team is here to help.
Visit our showroom to explore our collection of tuxedos, suits, bow ties, and formal accessories.
Schedule your fitting appointment today and experience the difference that professional formalwear guidance can make.
Frequently Asked Questions About Tying a Bow Tie
How long does it take to learn how to tie a bow tie?
Most people can learn the basics within 15 to 30 minutes of practice. After a few attempts, the process becomes much easier.
Is a self-tie bow tie better than a pre-tied bow tie?
For formal events, a self-tie bow tie is generally considered more elegant and authentic.
Can I wear a bow tie with a suit?
Yes. While bow ties are most commonly paired with tuxedos, they can also complement certain suits, particularly for weddings and special occasions.
What color bow tie should I wear with a black tuxedo?
A black silk bow tie is the traditional choice for black-tie attire.
Should a bow tie be perfectly symmetrical?
No. Slight asymmetry is normal and often preferred because it demonstrates that the bow tie was hand tied.



Leave a comment